Quick-and-useful: Build you a wishlist app with Astro, Solid, and Baserow
The first part of a series of posts about building quick and useful apps with Astro. Part 1: A wishlist app.

This is a part of the quick-and-useful series - a series of hands-on guides that teach you how to build small apps using Astro and a mix of other, interesting web technologies.
Background
Apparently, I’m a “hard person to buy presents for”. So, looking for small app ideas, I realized that building a wishlist app is a two-flies-with-one-swat deal. I get to make a small app that I’ll use, and I can document the journey for others to learn from. Bonus points for using a mix of web tech I love using.
The stack
- Astro - Astro, version 3.x in particular, since it’s easily the best thing on the web since organically grown HTML. Fight me.
- SolidJS - Solid because it offers a familiar JSX developer experience, and it plays well with Astro.
- Baserow - Baserow, because it’s a spreadsheet-as-a-database tool that’s easy to use and has a great API. It’s also open-source and self-hostable, a big plus in my book.
Which part does what?
We’ll use Astro in static-site generation mode. That means that our project layout and build tools will be provided by Astro. Once we go through the process of building it, we’ll get an excellent static site we can deploy virtually anywhere. If we squint a bit, we can call it our metaframework.
Solid will give us a bit of dynamicity for loading our list of wishes. Since that will be a component that lives on the client-side, and Astro primarily does server-side rendering, we’ll use Solid to fill that “void”.
Finally, Baserow will be our database and CMS rolled into one. We do want to edit that list somewhere, right?
Initializing the app
Assuming you already have Node.js 18+ installed, you can get started by running the following command on your CLI:
npm create astro@latest wishlist-appTechnically, you can omit the wishlist-app part, but Houston, the Astro mascot will ask you how to name your project during the setup process. Also, ideally, you’d initiate the project with the empty template with typescript support, on strict, but hey, you do you 😄. This guide should be easy to follow along, regardless of where you stand on the “types” debate.
Since we’re still in our CLI, let’s cd into our project folder and add the rest of the dependencies:
cd wishlist-app
npx astro add solid # press y for all the questions
npx astro add tailwind # technically optional, but recommended
With Astro, Solid and optionally Tailwind installed, we can start the dev server:
npm run devOpening localhost:4321 should show you an empty page at this point. Let’s change that.
Creating a layout
Choosing the empty option in the first step gives us a barebones Astro project. Most Astro projects on the web have some notion of a layout, and even though we don’t need one for this project, let’s add one anyway - for the sake of standards, if nothing else.
Create a new file in src/layouts called Base.astro and add the following code:
<html lang="en">
  <head>
    <meta charset="utf-8" />
    <link rel="icon" type="image/svg+xml" href="/favicon.svg" />
    <meta name="viewport" content="width=device-width" />
    <meta name="generator" content={Astro.generator} />
    <title>My Wishlist</title>
  </head>
  <body>
    <div class="flex flex-col items-center justify-center w-full min-h-screen px-4">
      <slot />
    </div>
  </body>
</html>
To those new to Astro, yes, this is just HTML. Except for the Astro global and the <slot /> tag, everything else is exactly what you expect in a run-of-the-mill HTML file.
On to the exceptions:
- The Astro global is an object that contains some useful info and utilities (check the docs for more). In our case,
Astro.generatorreturns the name of the generator we’re using, which isAstro 3.x.x. - The
<slot />tag is a special tag that tells Astro where to render the content of a page that uses this layout. In our case, that’s the content of the page we’ll be editing next.
The index page
We already have an index page from our initial setup, but let’s make it more interesting. Edit the contents of index.astro in src/pages to the following:
---

import Base from '../layouts/Base.astro'; // import the layout we just created

---

<Base>
  <h1 class="text-4xl font-black mb-3 mt-6 text-center">My Wishlist</h1>
  <h2 class="text-2xl font-light mb-12 text-center">Need ideas about what to get me?</h2>

  <div class="flex-grow">
    <div class="list">
      List goes here
    </div>
  </div>
</Base>
Next stop: data.
Setting up Baserow
Baserow is a spreadsheet-as-a-database tool. It’s open-source, self-hostable, and has an API. It’s also an excellent tool for small projects like this one because it can double as a simple CMS for our data. We’ll use the cloud version here, but if you’d like to give self-hosting a go, check out the docs.
Create an account
Title. At https://baserow.io 😉
Alternatively, if you have a self-hosted Baserow sitting around, you can use that too. The process is the same.
Create a table
Once you’re done signing up, you’ll be greeted by a dashboard. Click the “Create new” button and choose “database” from the dropdown.
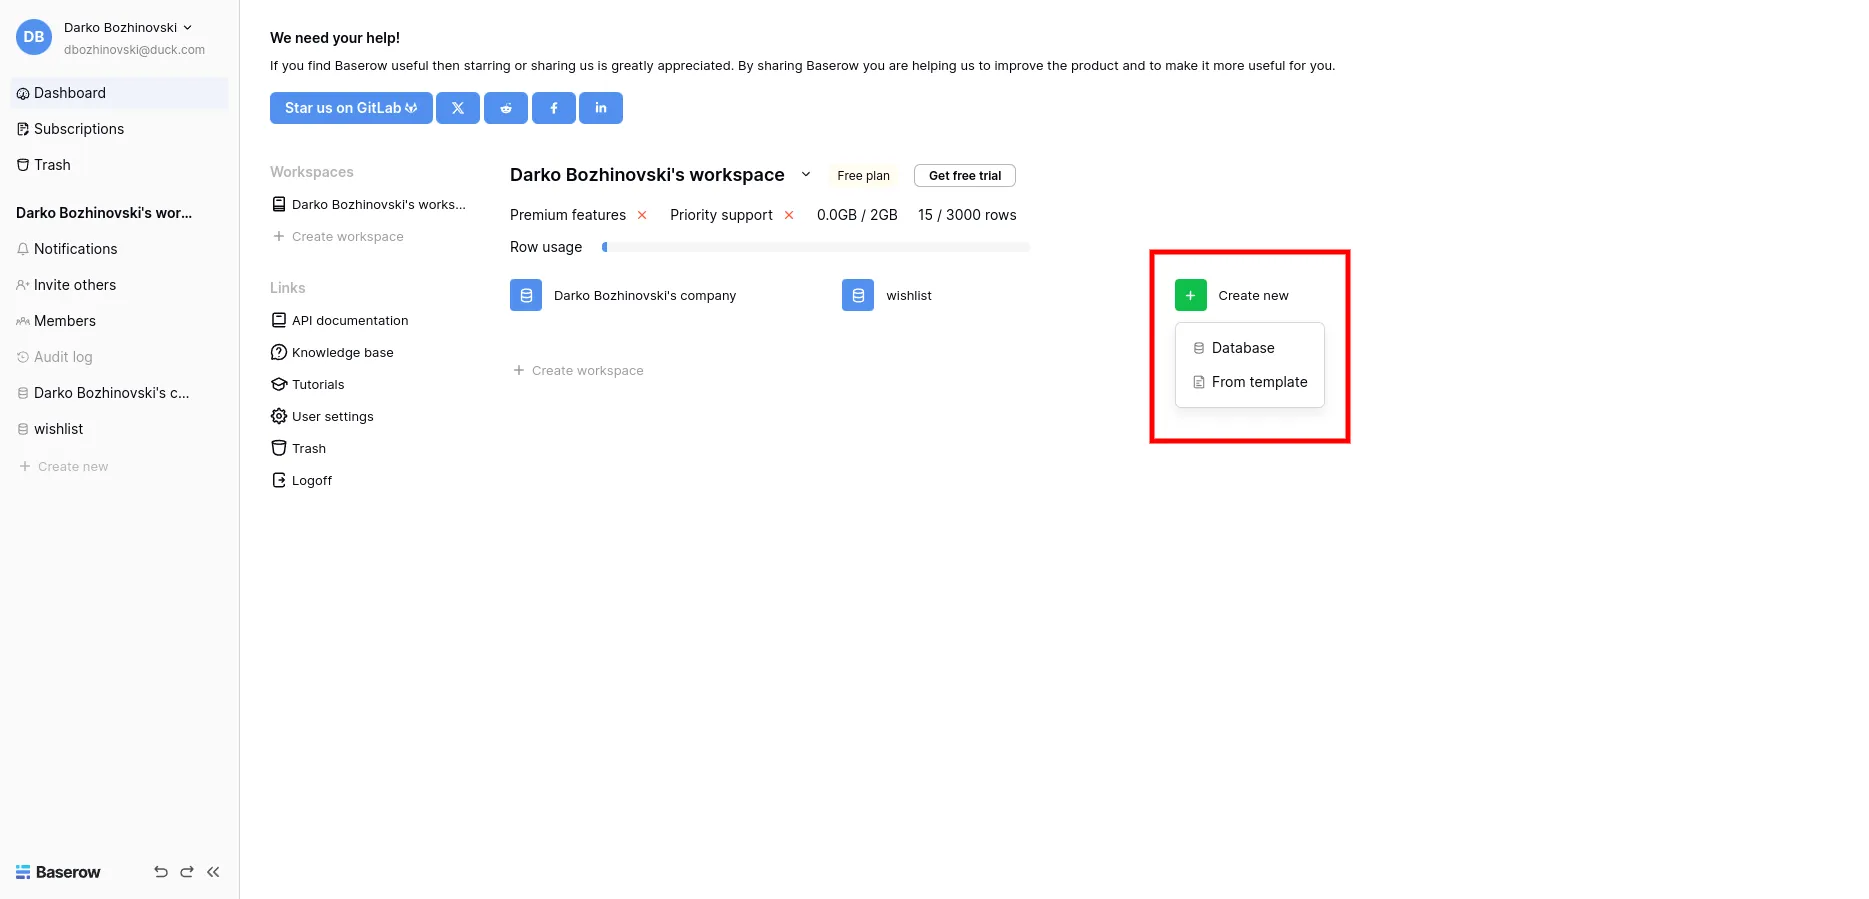
You’ll be asked to give it a name. I called mine wishlist, but it doesn’t really matter - name it whatever you want. Once you’re done, you’ll be taken to a new and mostly empty table. Let’s give it a structure!

Give our table a structure
We need two columns here: Title and URL. We have an extra column we can remove from the default table, but it’s unnecessary. We’ll use the Title field to give our wishes descriptive names. The URL field will be reserved for a link to the wish/gift idea, if applicable. Here’s a recording of me doing it:
At this point, it’s a good idea to add a few rows to the table (it works very similarly to Google Sheets). I added a few rows with some of my wishes just to have something to fetch:
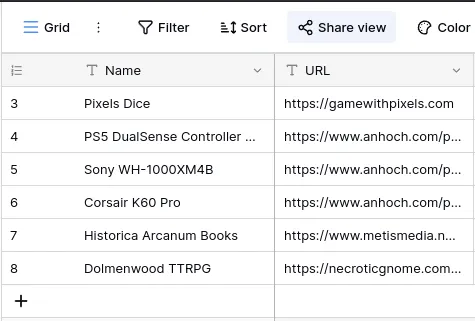
Take a minute to add some sample data of your own. We’ll need it in a bit.
Fetching Baserow data
Get an API token
Before we can fetch our data, we need an API token. Click on the top-left menu (the one with your name and email), and select settings. On the pop-up, choose database tokens and click on the “Create token button”. Give it a name, and in the workspace dropdown, select the workspace in which you created the table (likely the default one).
Once you set the permissions to your liking, click on the three dots next to the token name and copy the generated token. We only really need read access for the scope of our wishlist app. Here’s a video of me doing the whole thing:
Find your table ID
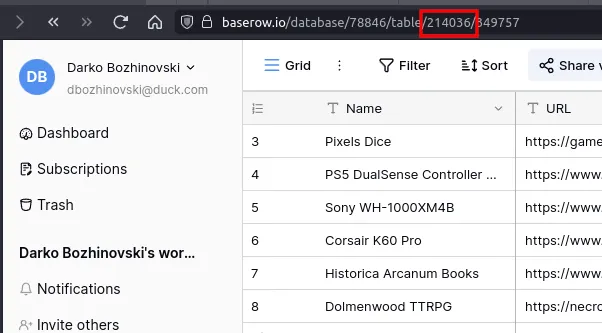
In addition to the API token, we’ll need the unique table ID for our table. There are a couple of ways to obtain this. The simplest one I could think of is:
- Select the table you created in the dashboard
- Copy the id from the URL (it’s the second number from the left)
Create a data fetch utility
Create a new file in data/baserow.ts. We’ll use this file to create a utility to fetch our data from Baserow. Add the following code to it:
const RO_TOKEN = "YOUR-BASEROW-TOKEN-HERE";

export const fetchWishilst = async () => {
  const response = await fetch(
    "https://api.baserow.io/api/database/rows/table/YOUR-DATABASE-ID-HERE/?user_field_names=true",
    {
      headers: {
        Authorization: `Token ${RO_TOKEN}`,
      },
    }
  );
  const data = await response.json();
  return data;
};
Note: For the keen observer — yes, I’m using the token here client-side. It’s a read-only token, so it doesn’t make much of a difference, but if you’re concerned about security, we’ll explore a few ideas about how to make this work the secure way later on.
Our List component
Finally, we can get to the Solid part of our app. Create a new file in src/components called List.tsx and add the following code:
import { createResource } from "solid-js";
import { fetchWishilst } from "../data/baserow";
import "./List.css";

export const List = () => {
  const [brData] = createResource(fetchWishilst);

  return (
    <ul class="">
      {brData.loading && <div class="text-xl py-2">Loading...</div>}
      {brData()?.results.map((item: any) => (
        <li class="text-xl py-2">
          <a href={item.URL} class="text-blue-700 underline">
            {item.Name}
          </a>
        </li>
      ))}
    </ul>
  );
};
Following this, create a new file in src/components called List.css (because TS is probably getting angry by now) and add the following code:
.list li {
  list-style: none;
}

.list li::before {
  content: "🎁";
  padding-right: 0.5rem;
}
Let’s have a look at what our list component does, line by line.
Component breakdown
As with most other JSX-based libraries, Solid components are functions that return JSX:
import "./List.css"; // The CSS file, so that our list looks pretty

export const List = () => {
  // We're rendering a list, so we're using the <ul> tag
  return <ul class="">{/* ... */}</ul>;
};
Next step, we need to fetch our data. We’ll use createResource for that. It’s a function that creates a signal that returns the result of an async request. For those familiar with TanStack Query, this is similar.
Combining createResource with our fetchWishlist function, we get the following:
import { createResource } from "solid-js";
import { fetchWishilst } from "../data/baserow";
import "./List.css";

export const List = () => {
  const [brData] = createResource(fetchWishilst); // brData is our signal, which runs fetchWishlist

  return (
    <ul class="">
      // Check whether it's still loading...
      {brData.loading && <div class="text-xl py-2">Loading...</div>}
      // Once the results are available, map them to a list
      {brData()?.results.map((item: any) => (
        <li class="text-xl py-2">
          // Each item comes with a Name and a URL, as we defined in Baserow
          <a href={item.URL} class="text-blue-700 underline">
            {item.Name}
          </a>
        </li>
      ))}
    </ul>
  );
};
With that, we have a list component that fetches data from Baserow and renders it. Let’s use it on our index page.
Using the list component
Add the following to the index.astro page:
---
import Base from '../layouts/Base.astro';
import { List } from '../components/List.tsx';

---

<Base>
  <h1 class="text-4xl font-black mb-3 mt-6 text-center">My Wishlist</h1>
  <h2 class="text-2xl font-light mb-12 text-center">Need ideas about what to get me?</h2>

  <div class="flex-grow">
    <div class="list">
      <List client:idle /> // The client:idle directive tells Astro to render this component on the client-side after the page is done with its initial load
    </div>
  </div>
</Base>
Finally, my version of the app looks something like this:
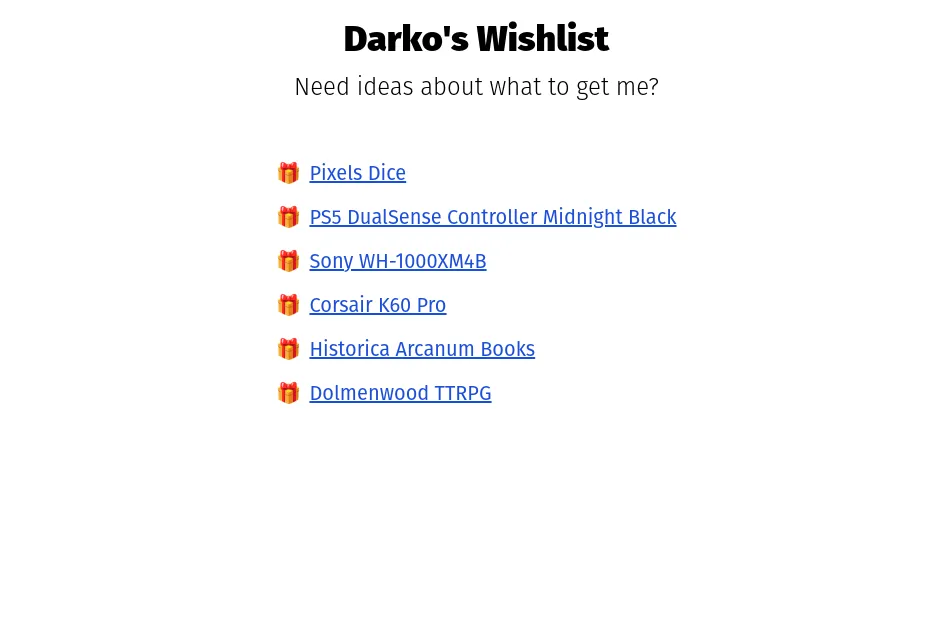
You can have a look at the app at: https://wishlist.darko.io
Complete source available at: https://github.com/DBozhinovski/wishlist-app
Tip: You can easily use the GH repo to deploy a wishlist app of your own.
Next up - let’s see how we can make this app a bit more secure, plus explore some alternative approaches.
Alternative approaches
For the security purists out there — yes, I agree that keys should not be public. I made an exception here because I wanted to keep this client-side only, for the sake of having an easy way to refresh the list without resorting to, e.g., lambdas. That said, let’s see how we’d approach this if security was a concern.
Using a lambda function
Instead of keeping the baserow key in the data/baserow.ts utility, we can move it to a lambda function somewhere (AWS, Netlify, Vercel, Cloudflare, it doesn’t really matter), and
- Send a request to the lambda function from the client
- Fetch the data from Baserow in the lambda function
- Send the data from the lambda back to the client
In this scenario, the lambda function would be the only one with access to the Baserow key. In effect, we’re creating a proxy for our data. This is a good approach if you want to keep your keys private, but it does add a bit of complexity to the app.
Using a server instead of a lambda
…Would amount to the same steps as above, but using a server-side technology of your choice. This adds even more complexity on top, as you have to manage a server in addition to having the SSG app.
Astro in SSR mode
Astro comes with an excellent SSR mode too. In a nutshell, that means that instead of having pages pre-built, a server (or a serverless thing, if you’d go for an adapter) serves the page on demand.
Again, we could keep the key on the server, read from an env file, and fetch the Baserow data in a server-side context before sending the page to be rendered.
As an interesting side effect, we’d no longer have to hydrate the List component at all. Since the server fetches the latest Baserow data (remember, we’re running a server now), we can pass the data as a prop to the List component, render that on the server, and send a static, HTML-only page to the client. This would make the app faster since we’d no longer have to wait for the client to fetch the data.
Takeaway
Astro is a great tool for building web apps, not just content-driven sites. In this post, we’ve seen how we can use it to create a wishlist app, using a mix of web technologies. We’ve also explored how to make it more secure with a few alternative approaches for solving the same problem.
I hope you’ve enjoyed this post. If you have any questions, feel free to reach out on Twitter or shoot me an email.
Stay tuned, as I’ll be writing more posts in this series. Until next time, happy hacking!